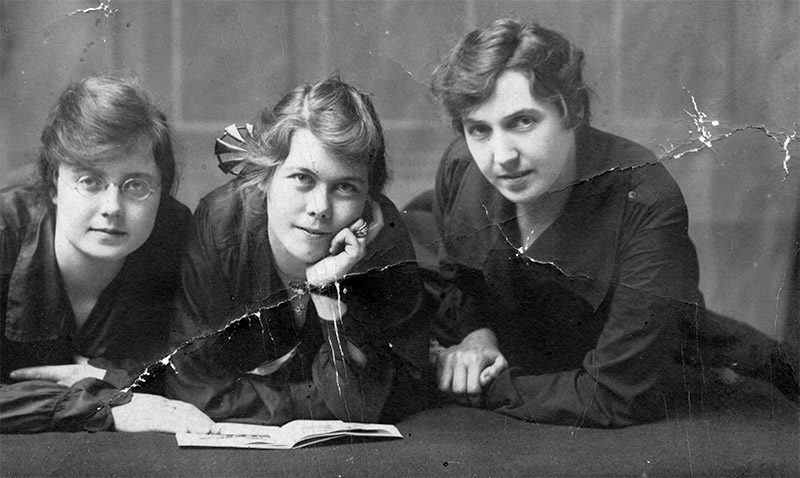
 Fig. 1. A scan of a cracked and crinkled photograph.
This week's column by Ctein
Here's a wonderful little trick I learned last year from one of my readers, Carl Kracht.
One of the difficulties that pops up with scanning prints is that if there are any creases, folds, ripples, tears or cracks in the paper, they catch the directional light in the scanner like you wouldn't believe. Figure 1 is a great example of it; notice how below the crack is darker than above it. It's not hard to use spot healing or cloning tools to get rid of the actual cracks, but what you do about the patches of different brightness? My old answer to that would be lots of tedious dodging and burning in in an adjustment layer. Carl gave me a much better one.
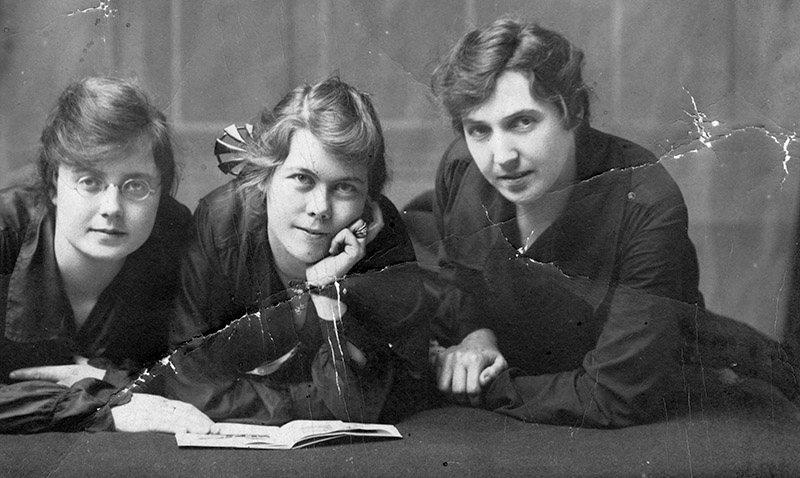
 Fig. 2. Same photograph rotated 180° and scanned again.
Rotate the print 180° and make a second scan, as shown in figure 2. Reversing the direction the scanning light comes from reverses the pattern of shadowing and highlighting in the paper.
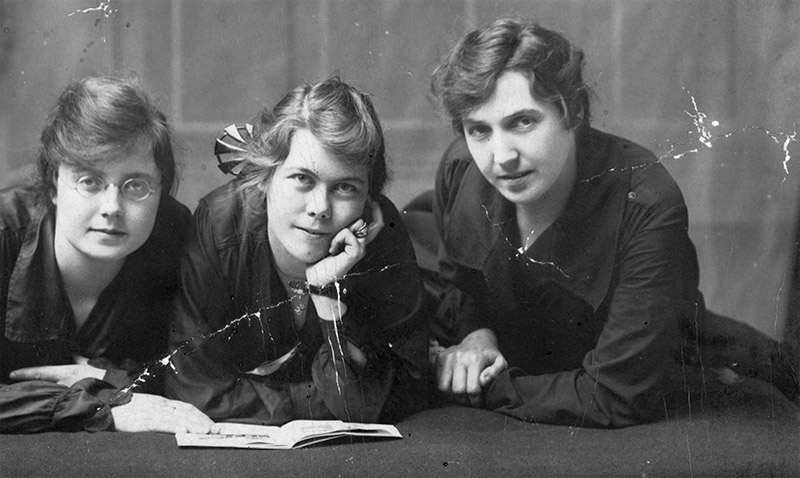
Then average those two scans together (figure 3). It eliminates that problem! It can even make some fine cracks and damage disappear.
 Fig. 3. The Statistics/Mean blend of the two scans in figures 1 and 2.
In Photoshop CS6 Extended, this algorithm is buried under "File/Scripts/Statistics... ." Choose Stack Mode: Mean and point Photoshop at the two files you want Photoshop to combine. Make sure that the "Attempt to Automatically Align Source Images" box is checked. Click OK, and Photoshop generates an averaged blend of the two files.
Any image processing program that has a similar averaging function can do this. (Don't ask me which ones they are. Betcha our readers know, though.)
In theory you can get even better results by averaging scans in four directions at 90° to each other. In practice many scanners have a very slightly different pixel pitch across the sensor array than in the direction of carriage travel. Normally, the fraction of a percent distortion doesn't matter, but it may make a sharp blending of scans at right angles to each other impossible.
I make it easier for Photoshop to produce a sharp result by modifying my scans in Photoshop to bring them into very close alignment before blending them. I open both files, make a copy of "scan 2," and paste it into "scan 1," where it appears as a new layer. I set that layer's opacity to 50% to make that easier to see what's going on and rotate and translate that layer until I get a good match. I copy out the modified second layer, paste it into a new file, save it, and use that file to blend with the scan 1 file.
It takes longer to do a scan this way, but I save a whole lot more time by making a whole lot of crap disappear so that I don't have to clean it up later.
©2013 by Ctein, all rights reserved
Ctein's weekly columns, which scan best from top to bottom, appear on Wednesdays on TOP. He is the author of Digital Restoration from Start to Finish: How to repair old and damaged photographs from Focal Press, now in its Second Edition.
Original contents copyright 2013 by Michael C. Johnston and/or the bylined author. All Rights Reserved. Links in this post may be to our affiliates; sales through affiliate links may benefit this site.
(To see all the comments, click on the "Comments" link below.)
Featured Comments from:
Matthew Miller: "This also works really well for scans of prints on textured paper."
Stan Greenberg: "As per Matthew's comment, this trick very often works for scanning textured photos. Always worth a try, because everything else essentially boils down to making the image selectively fuzzy. Yes, this trick can be done in Paint Shop Pro, using layers. One other additional trick: when aligning the two scans, use 'Difference' as the blending mode. When the blend is pure black (or as close as you can get to pure black) the two layers are aligned.
"Another maybe superfluous comment: you have to perform two physically different scans, you cannot simply tell the scanning software to rescan the second time with a 90 degree rotation. (May sound obvious, but I had to learn this the hard way.) This is a wonderful technique—I think I discovered it on a Retouch Pro web site forum. Stan Greenberg, Kibbutz Kabri, Western Galilee."
Ctein replies: Yeah, works well with textured papers. Doesn't always work with the embossed "honeycomb" portrait papers, because sometimes there's an actual difference in the density. But always worth a try. The difference trick for alignment sounds Fine. I knew that...but forgot it! Thanks. Yes, the print needs to be physically rotated on the scanner platen, so it's facing the opposite way during the second scan. Thanks for emphasizing that.

Thanks Ctein,
very useful tip.
Posted by: Another Phil | Wednesday, 27 March 2013 at 12:21 PM
Seriously useful tip. I'll have to remember this next time I'm dealing with a battered old print I need to scan properly.
Posted by: Paul Glover | Wednesday, 27 March 2013 at 12:58 PM
a remarkable coincidence (if it is one) that you and Thom Hogan talk about the stack-and-mean technique on the same day!
Posted by: almostinfamous | Wednesday, 27 March 2013 at 01:03 PM
Thanks Ctein, I do alot of restoration and I appreciate finding new methods that work to deal with problems, (or, rather, challenges). I actually turned away a large and very complexly cracked hand coloured photograph recently because my methods would have made the restoration beyond the clients budget - this may have helped, though the damage was more crater like rather than linear. With black and white photos I often find that a slight difference in reflectance can be reduced by the same methods as those to deal with tarnishing, i.e. more often through the blue channel or more crudely using the blue or cyan in Hue/Saturation. Adjusting Lightness, for example, in the hues changes density for uneven areas and is a quick way of reducing stains on black and white photos: I don't think I can tell you anything new, Ctein, your book on Digital Restoration has been a great help. The interesting thing about restoring is that there are many varied techniques that can be used effectively for different levels of finish - mainly dictated, for me, by the size of reproduction that is asked for. Many small faults are often useen in a finished print, so it is often the case to not work on areas at too great a screen magnification or it becomes too time consuming - and not many customers want to pay me for more than an hour or twos work.
Thankyou, Mark Walker.
Posted by: Mark Walker | Wednesday, 27 March 2013 at 01:20 PM
Dear almost...,
Yes, total coincidence; Thom and I don't even much correspond with each other.
What this trick did teach me is that I need to look a lot more closely at Photoshop's "Statistics" functions, which I'd been pretty much ignoring.
pax / Ctein
Posted by: ctein | Wednesday, 27 March 2013 at 01:33 PM
Wow! Nice one Ctien. I guess I'm gonna have to go ahead and buy your book on photo restoration. I've been putting it off for a couple of years. If congress were full of critters like myself, the spending problem would be solved! But could you please tell Mike to stop renting, reviewing, and then buying cameras. My defenses are weakening.
Posted by: Walt | Wednesday, 27 March 2013 at 01:50 PM
Huh; how does that work? I guess the actual lighting at the moment of sampling is more complex than the model in my head (no real surprise there). Ah; but the light and the sensors can't be exactly aligned for reflective materials, so there's an angle one way or the other. Yep, okay, makes sense now.
Anyway it clearly does work, those are good illustrations.
Posted by: David Dyer-Bennet | Wednesday, 27 March 2013 at 02:11 PM
Can I ask your readers "Can it be done without an Extended version of PS?".
Posted by: Steven House | Wednesday, 27 March 2013 at 02:29 PM
Very clever trick to stash away. Thank you.
Unfortunately, while I may remember having stashed such a tip it's unlikely that I'll be able to recall where.
Posted by: Kenneth Tanaka | Wednesday, 27 March 2013 at 03:54 PM
Very nice. I have CS5 (not extended), so I put the second image as a new layer over the first and set opacity to 50%--seemed to do the trick.
Posted by: Greg | Wednesday, 27 March 2013 at 04:19 PM
@Steven House.... the Thom Hogan article linked to above in a comment explains how to do his averaging with layers too, in regular Photoshop. He is using it for noise, but I suspect you can do this as well.
Posted by: John Krumm | Wednesday, 27 March 2013 at 07:44 PM
Dear Mark,
Although the illustration for this article shows cracks, this technique really isn't about cracks, it's about any ripples or other deviations from flatness in the print. Basically, if the print doesn't lie perfectly flat on the platen of the scanner, there will be variations in brightness and this technique will largely eliminate those variations. So, depending on the nature the “craters” in your prints, it may considerably help with those.
It's powerful enough that unless I start off with a print that I know is perfectly flat, I make two scans in reverse directions as a matter of course.
~~~~
Dear Walt,
Well, this particular trick isn't in the book; I learned of it after I wrote the most recent edition (which is well over two years old and, no, there isn't going to be a third edition for at least another 18 months).
But there are plenty of other cool tricks!
pax \ Ctein
[ Please excuse any word-salad. MacSpeech in training! ]
======================================
-- Ctein's Online Gallery http://ctein.com
-- Digital Restorations http://photo-repair.com
======================================
Posted by: ctein | Wednesday, 27 March 2013 at 10:02 PM
Throw the scanner out the window for this type of picture. Use a copy stand and cross-polarize.
Posted by: Bob Rosinsky | Thursday, 28 March 2013 at 08:33 PM
Dear Bob,
If you reread my book, you'll find I cover that in detail.
Here's the thing. It doesn't work any better than the scanning trick (although it is a lot better for tarnish and other reflective blemishes). So, depends on your setup.
If you don't have a cross-polarized copy stand permanently set up (more photographers have scanners ready to go than copy stands ) it's a lot more time and effort consuming. If you do it's definitely faster.
Note: some restoration work is best done with much higher resolution images than you may get from an ordinary digital camera.
pax / Ctein
Posted by: Ctein | Friday, 29 March 2013 at 10:33 AM
For the honeycomb papers you need the Fast Fourier Transform that is only available for Windows. I could retouch a reproduction of an old photo with that pattern using Imagej for Mac OSX. Is for those times you have not the original photo to rescan. But I don't believe if it works with a cracked photo.
Posted by: Hernan Zenteno | Sunday, 31 March 2013 at 01:23 PM