(Second of an indeterminate number of parts)
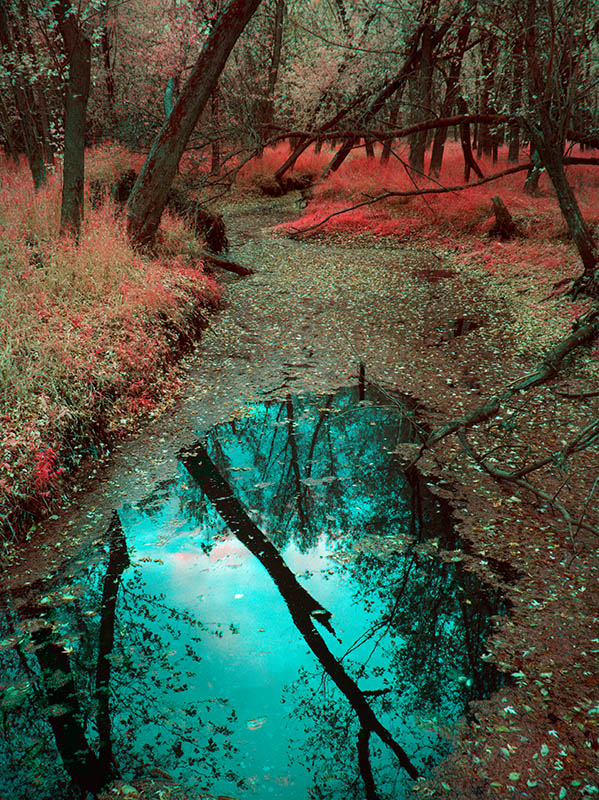
 Fig. 1. I've made some portfolio-worthy false-color digital IR photographs
but
not many, and it's devilishly hard work. Consequently, it's
not high on
my priority list
-
This week's column by Ctein
Last week I told you how I got my Olympus Pen E-P1 camera converted to 830 nm (a.k.a. "deep") infrared by Life Pixel. I didn't opt for the full-spectrum conversion, although I considered it. I have some theoretical interest in exploring ultraviolet photography, and I have done false-color infrared work (figure 1). Converting for full-spectrum, though, would've required me to buy a whole bunch of auxiliary filters. Just about every lens I own uses a different filter size. Even with step-down rings, I'd be more than doubling the cost of the endeavor, and the equipment would be a lot less convenient to work with. Life Pixel assured me that if I wanted to opt for that (re-)conversion later, they could do it (for additional money, of course).
As soon as I started working with the IR-converted Pen several characteristics jumped out at me. First, a Micro 4/3 type design is really ideal for IR work. There are no problems with focus shifts or corrections, because the camera is focusing based on what the sensor sees. There are many fewer issues visualizing how a photograph is going to look in the infrared, because what you see on the back screen of the camera is a black-and-white infrared photograph. It's a very natural way to work.
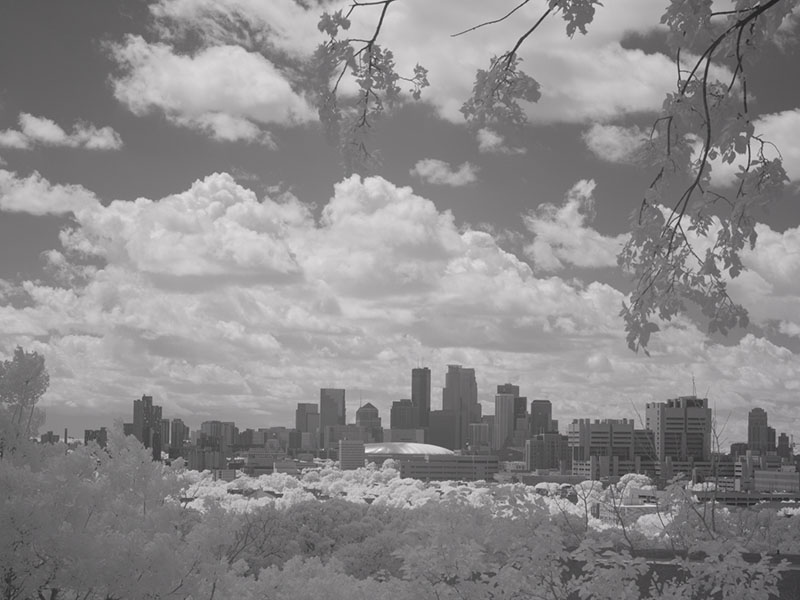
 Fig. 2. This is a "straight" RAW conversion from my IR Olympus Pen, using my normal default ACR settings
The photographs that come out of my camera are very flat (figure 2). There are no true blacks and the only time there are pure whites is if there is a direct light source or specular reflection in the photograph or the contrast range of the original scene is really extreme. I can't say whether this is inherent in the scenes themselves, in the behavior of the sensor/filter stack in the deep IR, or purely a consequence of the fact that anti-reflection coatings on lens elements don't work especially well in the IR.
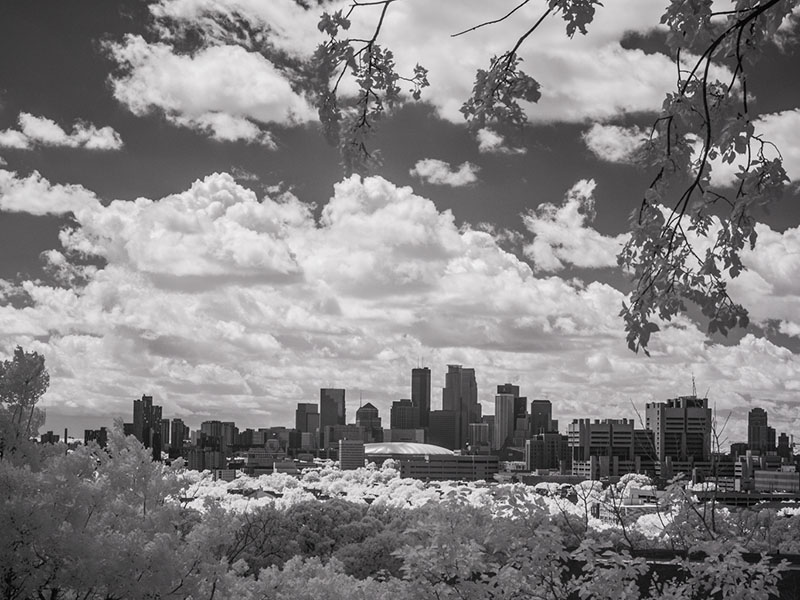
Whatever the reason, photographs are typically low in contrast with extremely poor micro-contrast and tonal separation in fine detail. My standard conversion in ACR for the IR Pen pushes the contrast slider up around +65 and has the clarity slider pegged at +100. Even that's often not enough; I may pull in the black and white clipping points in ACR or do additional local contrast enhancement in Photoshop using wide radius unsharp masking or ContrastMaster. The photographs look great after I make those adjustments (figure 3).
 Fig.
3. The same photograph after I greatly boosted the contrast and clarity
and pulled in the black and white clipping points in ACR
High-ISO noise was less of a problem with my converted camera. That's because the first noise to kick in offensively with the Olympus Pen is chroma noise. No chroma in these photographs! I've previously written that I considered the Pen usable up to ISO 800 for professional-quality work. After the IR conversion, it's ISO 1600.
(Important side-note: in all discussions of noise in this camera, I'm going to be talking about what it looks like after I've made the contrast adjustments needed to make the overall photograph look good. The appearance of noise is awfully sensitive to global and local contrast, so what you really care about is how it looks in a photograph with good contrast characteristics, not what comes out of the camera.)
Noise is an important consideration, aesthetically, because in the IR the sky is almost always very dark and there's more noise at the dark end of the exposure scale than the light end. Furthermore, because Raleigh scattering goes as the fourth power of wavelength (that's why the sky is blue, in case you didn't know), shadows are even darker in the infrared than they are invisible light.
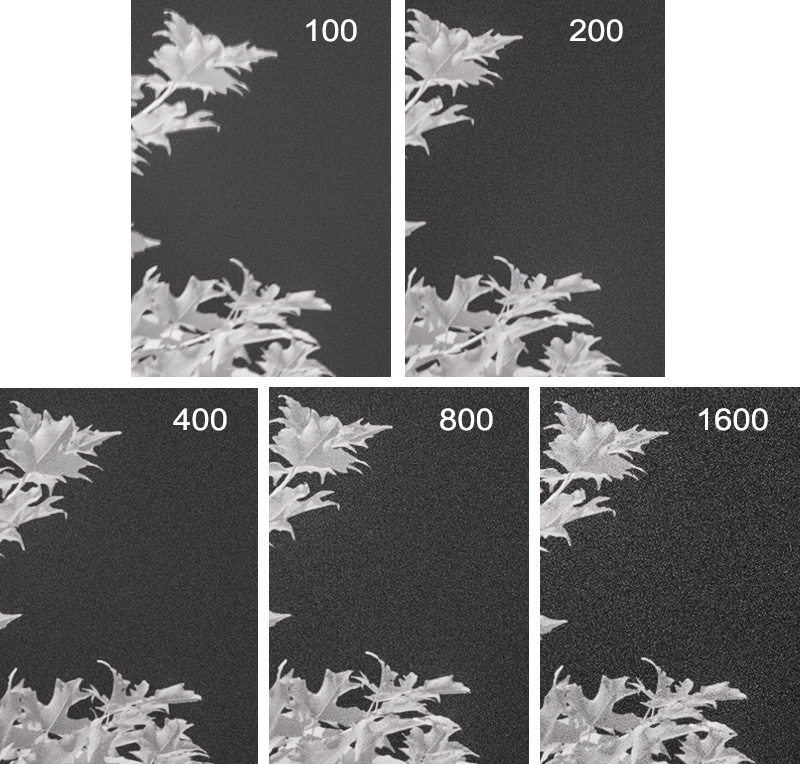
Most conventional cameras show little difference in noise at the lower ISO settings, but noise steadily grows with increasing ISO in my IR Pen. The camera exhibits extremely low noise at an ISO 100 setting, but every stop above that shows a clear increase in noise (figure 4). It's very uniform and smooth; really, it looks like film grain rather than annoying digital noise, but it does increase with each increment. In subjective language, I'd describe ISO 100 as being essentially grainless, ISO 200–400 as being very fine-grained (relative to 35mm conventional black-and-white film), ISO 800 still fine-grained and ISO 1600 medium/coarse-grained. Above 1600, I don't consider the camera usable because large-scale stripe patterns appear, and the "grain" loses the totally random, uniform quality.
 Fig. 4. Noise in the IR Olympus Pen at various ISOs (the RAW files were
corrected using the same ACR settings as for figure 3). Pay no attention
to the sharpness of the leaves—it was a windy day
Between that and wanting/needing to use lens apertures in the ƒ/3.5–ƒ/5.6 range (I'll get to that in the next installment), one can wind up a bit light-starved even on a sunny day. A sunlight exposure at ISO 100 would be something like 1/300th sec at ƒ/4, after the two-stop deep-IR-conversion loss. But, with far less light in the shadows you can readily drop 3–4 stops. If you want to stop down for more depth of field or better sharpness or use a longer lens, well... ISO 100 doesn't cut it. I'm willing to accept the two stop speed loss to get purer IR characteristics, but I can understand why many folks might prefer the conventional IR conversion.
Putting this in perspective, though, the IR Pen still produces photographs at ISO 800 that are less grainy than the brute-force IR photography I talked about last time.
The next time I come back to this subject, in two (?) weeks, I'll tell you how a whole bunch of different lenses performed in the IR. Stay tuned to this station.
©2013 by Ctein, all rights reserved
Weekly columnist Ctein's work usually appears on Wednesdays, but Mike the Ed. was traveling this week.
Original contents copyright 2013 by Michael C. Johnston and/or the bylined author. All Rights Reserved. Links in this post may be to our affiliates; sales through affiliate links may benefit this site.
(To see all the comments, click on the "Comments" link below.)
Featured Comments from:
Oskar Ojala: "Out of curiosity, is the false color IR picture taken on Kodak EIR or something else? I tend agree with your conclusions though; in my experience false color IR usually turns into a gimmick rather than something that stands on it own and thus I've concentrated on BW IR this year. There are good examples of false color IR—I've even managed to take some shots myself that I liked—but it's a very challenging medium.
"For a while I've used converted Sony NEXes for IR, before that a Nikon and have also converted a prosumer Canon as an experiment. All except the Canon were multispectral versions. The Canon, with a deep enough filter to render an entirely monochromatic image, worked very well actually. While my IR pictures tend to have flatness, it hasn't been as extreme as your example, although the settings might differ. Specifically, blacks aren't nearly black enough for me. There could be many reasons for that.
"One thing I have found is that there are huge differences in lenses for IR and especially most wide angle lenses tend to work lousy, with too many aberrations ruining everything but the center. Contrast also varies a lot. My lens selection has been a long process."
Tim: "Perfect timing with these posts, I recently (last Thursday) acquired a second hand full spectrum E-PL1. I've only used it for a weekend, but I think I'm going to have a lot of fun with it. The full spectrum images converted to black and white at first glance are really appealing to me. I wanted to let you know that I'm really enjoying these posts."

What a splendid shot of the Minneapolis skyline! I'm guessing it was taken somewhere on the East Bank of the University of Minnesota campus? Possibly the Weisman museum?
Posted by: HT | Friday, 19 July 2013 at 03:16 PM
On my unconverted Oly OM-D I get a noticeably broader tonal range using a 720nm IR filter than with filters that block all visible-spectrum light. With an 800nm+ filter my out-of-camera photos look very similar tonally to Ctein's example. (Exposure times sky-rocket too! Forget handheld at any ISO.) In addition lenses from different makers transmit IR with different degrees of efficiency. I imagine this is down to coatings and maybe even glass types. I'm finding earlier Nikkors (via adapter on the OM-D) to be particularly good in this respect...and it helps too that many of 'em can use the same 52mm filters.
Posted by: David Kieltyka | Friday, 19 July 2013 at 03:24 PM
I converted my Nex5n to full spectrum and did a bit of UV photo testing; one of my dream of photography (8x10 and UV).
My testing (see one of 3 sets here: http://www.flickr.com/photos/dennisngathk/sets/72157634625803674/ ) showed that not all lens can do UV but surprising the cheap lens 30mm macro and 16mm (even with the adapter) do quite well (to my basic standard; handhold is just doable but of course one should use tripod). In fact, even an unmodified nex6 seems to do it well (if you use higher iso and use stabilised lens OSS 50 f1.8). That is a surprise. I know now how minolta colour from :-). It is also all 49mm (except for the cheap kit lens 16-50).
BTW, the Nex6 review here is not that good as a camera review. When I decide to get one after converting my Nex5n, I tried to read it to decide Nex6 or old Nex7. I knew more about the lens than the camera. Good writing; need to head to the other site for information. Next time, may I ask the great master try review a camera with the kit lens first and concentrate on the camera. Most people buy it (or force to buy it that way). Love the Zeiss lens though after reading (not happen any time soon).
I was told m3/4 is even better (or at least one has to use nex6) as one need to use UV flash if one is serious about it. (But remember UV hurt and cauce cancer; use protection gear or like me just use the sun only and hence nex5n with a hat and sunglass).
I use Leica M8 for IR for awhile (well; one can do lemonade) and you can see unlike using SLR with optical viewfinder. However, I agree IR under mirrorless is even better. But I do not like IR colour pic as too many operation afterwards for false colour if you want to do it a bit more justice. Yours look nice (as it is from you) but I guess it just take too many steps and time. For me, why not try painting! However, black white is my intended option for my fully specturm converted.
Posted by: Dennis Ng | Friday, 19 July 2013 at 10:57 PM
Dear HT,
Figure 2/3 was actually made from alongside Witches Hat water tower, but it's funny you should mention the Weisman. Coincidentally, I do have some IR photos made five years ago of the Mppl skyline from the campus near there. None of the skyline were worth adding to my portfolio, but this one was from the same session:
http://ctein.com/Weismann_IR.htm
pax / Ctein
Posted by: ctein | Saturday, 20 July 2013 at 01:41 AM
I'll follow your exploration of the invisible light with great interest. It seems that the dullness of the original files is a normal feature of digital IR, which makes it very different from what we remember from extremely high contrast IR films. And as you have noticed a strong boost in microcontrast transforms the image for the best. I find the "structure" tool in Nik's plugins extremely beneficial, both for B&W (in Nik Silver Efex) and in false colors (this time using Nik Viveza). You can see some examples on my blog: http://olivier-anthony.host22.com/
Unfortunately the site is now plagued with intrusive advertisements, I have to do something about it!
Posted by: Olivier Anthony | Saturday, 20 July 2013 at 02:18 AM
Dear Olivier,
Thanks for the suggestions. Much appreciated.
I really like the panorama of the hedge maze, but the photos load so absurdly slowly and the popups are such a turn-off that I couldn't bear to look at very many photos. Good luck with the site rebuild!
pax / Ctein
Posted by: ctein | Saturday, 20 July 2013 at 02:59 PM
Love the unique shot of the Weisman. Thanks for sharing!
Posted by: HT | Saturday, 20 July 2013 at 04:24 PM
Dear HT,
Well, here's another (of the Weismann, that is):
http://ctein.com/Weismann_Museum.htm
pax / Ctein
Posted by: ctein | Saturday, 20 July 2013 at 08:45 PM
Dear Oskar,
You're asking about figure 1? Like the caption says, it's digital.
I think you'll be surprised by some of my lens results in two weeks. I know I was.
pax / Ctein
Posted by: ctein | Saturday, 20 July 2013 at 09:53 PM
Lack of contrast in digital IR is a multivariable function of (false colour recording primarily in one channel - usually R, Bayer filter, longer wavelengths relative to visible light, IR reflectivity of subjects, etc). The etc input is there to cover whatever I'm forgetting as I write late this evening. "-)
With the longer IR, surface detail and microcontrasts are lost and DoF is slightly less as compared with a Visible shot at the same aperture. This is all less noticeable for infinity shots and quite obvious for close-up shots. Local contrast edits can help a lot but will never totally restore the Visible equivalent microcontrasts. And of course, one cannot restore detail that simply is not there in IR.
For many IR scenes is difficult to stretch an IR histogram enough to get close to near-black and near-white endpoints. It seems this is less of a problem when shooting deeper IR from about 850nm onward.
Recently I have become enamoured of the Detail slider in the converter Photo Ninja. It greatly enhances IR local contrasts - much better than any of the standard Photoshop tricks we've all learned. PN's Detail slider seems to be similar to a kind of High Pass Overlay, but without the edge problems that HPO can induce - so there must be some edge masking happening? Anyway, it is worth downloading a Photo Ninja trial just to see how the Detail slider might work for your IR photos. (I have no affiliation with PN.)
Just for the record, UV with its shorter wavelengths performs oppositely - tends to be contrasty, has extremely high surface detail and microcontrast, provides slightly more DoF and delays the onset of diffraction by about a stop. SSoC, a UV shot will also look rather flat, but a white-balance tool fixes that quickly. In most UV shots, I have to pull in both ends of the histogram rather than pull them out. There is almost always a blocked shadow and a blowout in every frame. Switching to a modified D600 for UV shooting has helped with this because of the D600's wider exposure range. (Did I say that correctly?) Close-ups in UV are amazingly detailed. Landscapes in UV are terrible - skies blow out, everything else is dark, far detail disappears in a hazy mess - those short waves will do that.
Ctein, I'm looking forward to more of your Pen-IR adventures.
Posted by: Andrea B. | Saturday, 20 July 2013 at 11:21 PM
Hi, Andrea!
Thanks for that information. It's useful to know that the low contrast is a typical characteristic of IR-converted cameras and not something peculiar to this model.
So far I haven't found a problem correcting the contrast to give me an attractive full or near-full tonal range, even from extremely flat originals. With approximately 12 bits of real data in a raw file, I'd be very surprised if I'd hit such a wall. JPEGs would be an entire nuther matter, of course, but I don't do JPEG.
Funny you should mention Photo Ninja. Mike suggested some many months ago that I hit them up for a review copy and review it for TOP. The matter got put aside due to the insane-making print sale. But when I was back in Minneapolis last month, DDB and I played around some with Photo Ninja with some IR photos, and I was also very impressed with the enhancement controls; they seemed to do an even better job than the Clarity slider in ACR. Plus, it's now the source for Noise Ninja, so it's moved up in my queue. Maybe when I dig out from under, soon now, I'll hit them up for that review copy.
And speaking of digging out from under, no, I haven't forgotten about your boxed portfolio, not in the least! I've just been too overwhelmed to do anything about it. But I'm seeing the light at the end of the tunnel, and this time I really don't think it's an oncoming train.(he said hopefully)
pax \ Ctein
[ Please excuse any word-salad. MacSpeech in training! ]
======================================
-- Ctein's Online Gallery http://ctein.com
-- Digital Restorations http://photo-repair.com
======================================
Posted by: ctein | Sunday, 21 July 2013 at 02:44 AM
Dear Ctein,
Thanks for the answer. Somehow I managed to miss the word "digital", reading as the last thing of the day might not be wise.
I'm sure I will be surprised. My own tests frequently surprise me; a simple prime lens that offered excellent performance in visible light had low contrast and artefacts in IR, while another of similar focal length but different design produced a sharp and contrasty image. My current lens setup is a peculiar mix of fixed focal length lenses, but I have no clue with what you will end up with.
Posted by: Oskar Ojala | Sunday, 21 July 2013 at 03:25 AM
Ctein - no problem on that boxed portfolio. I know it's a-comin'. I will probably forget about it again, and it will be a pleasant fall surprise. "-)
Posted by: Andrea B. | Sunday, 21 July 2013 at 01:17 PM
Kudos to Ctein for exploring IR photography. Now I want to get my E-PL1 converted.
Posted by: Bob Rosinsky | Sunday, 21 July 2013 at 02:46 PM
hi Ctein, I am enjoying your post here. I used Kodak's High Speed Infra-red Film in the past. Then for Digital,I used a Wratten 87C gelatin filter in front of my Fuji S2 Pro back in 2005, and after hours(well, I used to do darkroom work!) of post-processing, I could print images 2ft x 3ft. Then I bought the Fujifilm IS-1, a full-spectrum factory-made infra-red camera which has been great with red, blue filters..and of course the Hoya R72 filter.
Like yourself, I just sent my Olympus Pen EP2to be converted to having a 665nm internal filter. I found a place in Canada, ie in Quebec, who get their filters from Lifepixel as well as Kolari Vision.
Anyone who is a Printer, ie used to post-processing, will enjoy digital infra-red. I look forward to seeing your future work!
Posted by: ben ng | Sunday, 21 July 2013 at 04:49 PM
Dear Oskar,
Yes, it's quite difficult to guess how a lens will perform in the infrared because most lens design considerations are wavelength-dependent. You only correct for aberrations and design anti-reflection coatings to work over the wavelength range you expect the lens to be used. Move even 50 nm outside of that range and things go all the hell. Or not. It's all side effects, not what the lens designer is concerned about.
This has always been true, for all types of lenses, in case anyone is wondering. It just normally doesn't come up. An oddball example of it happening was when variable contrast paper manufacturers extended their paper sensitivity down into the deep-violet/near-ultraviolet. Many enlargers emit enough light at those wavelengths to matter (surprising, but true) and the lack of good correction in enlarger lenses at those extremes created some interesting problems.
pax \ Ctein
[ Please excuse any word-salad. MacSpeech in training! ]
======================================
-- Ctein's Online Gallery http://ctein.com
-- Digital Restorations http://photo-repair.com
======================================
Posted by: ctein | Sunday, 21 July 2013 at 05:23 PM
Dear Andrea,
Following up on one of your observations–– I am guessing that the variation in depth of field that you're seeing in the IR and UV is a result of the different sharpness of the lenses at those extreme wavelengths? Real depth of field is a combination of theoretical geometric-optics depth of field and the actual real-world performance of the lens. Anything that makes the lens less sharp reduces the depth of field.
Just guessing…
pax \ Ctein
[ Please excuse any word-salad. MacSpeech in training! ]
======================================
-- Ctein's Online Gallery http://ctein.com
-- Digital Restorations http://photo-repair.com
======================================
Posted by: ctein | Sunday, 21 July 2013 at 05:27 PM