This week's column by Ctein
This picks up where last week's column, "Photographing from Commercial Airplanes," left off.
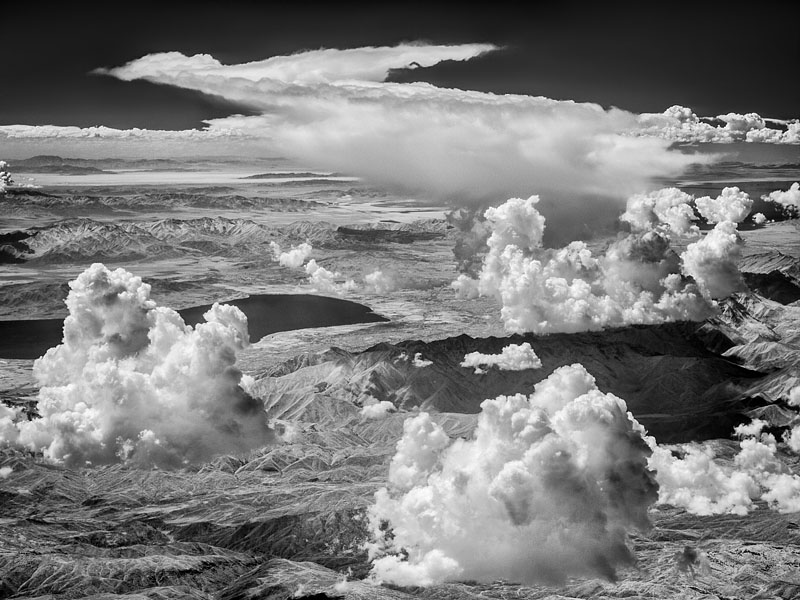
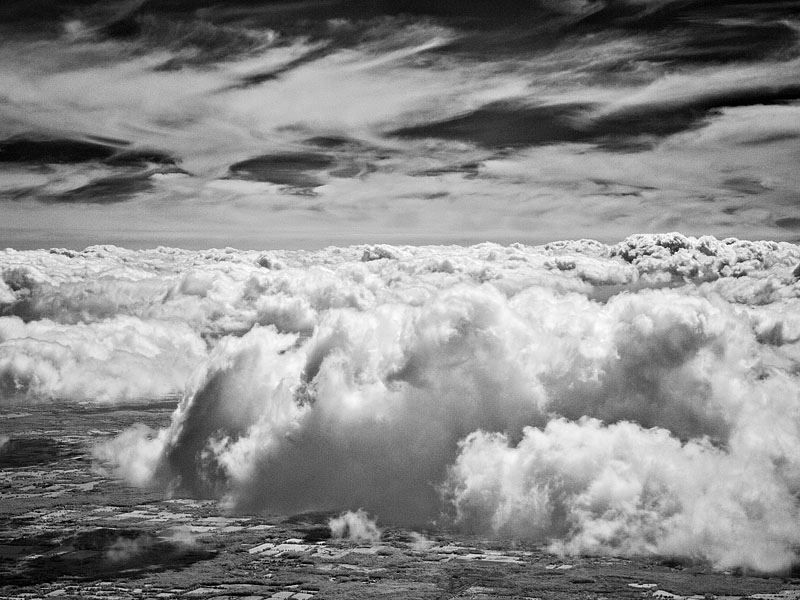
The tricks to making good black-and-white photographs from commercial airliners aren't much different from the ones for color photography. I've been getting spectacularly good results in the infrared, as the lead illustration, above, and figure 1 show. Atmospheric scattering, though, is even more of an issue for black-and-white work than color, because the only thing that differentiates parts of the photograph are differences in brightness.
Clear air primarily scatters short wavelengths (Rayleigh scattering). Dusty air scatters all wavelengths (Mie scattering). Both kinds of scattering reduce the contrast in black and white photographs. If you want to retain panchromaticity, you need to boost the contrast way up to get a decent-looking photograph. There's nothing that looks worse than a washed out black-and-white photograph. Back when I was using film, I did my aerial photography on stuff like Tech Pan film developed to a gamma of over one. This looked a hell of a lot better than normal contrast film that had to be printed on grade 4 or 5 paper. Exposure was a bit tricky, I'll admit.
Digital photography lets you easily increase contrast when massaging the data, but substantial increases in contrast will also produce substantial increases in image noise. Even a very low noise camera may produce fairly "grainy" photographs once you're done correcting the contrast. It's just something you have to live with. This is one of the very rare cases where "expose to the right" makes sense... but watch out for blowing out the clouds.
If you're willing to forgo a panchromatic response, and most photographers would under the circumstances, what you want is a really sharp-cutting red filter. I recommend a Wratten #29. That will do a better job of cutting through the haze of scattered light than merely selecting the red channel from your digital file.
An infrared camera, like my converted Olympus Pen, works even better. The photographs don't actually look much different than ordinary black-and-white ones made with a red filter—it's just it's a super-effective red filter. Since there's a huge amount of scattered light, infrared photography just kind of gets me back to where I want to be to begin with.
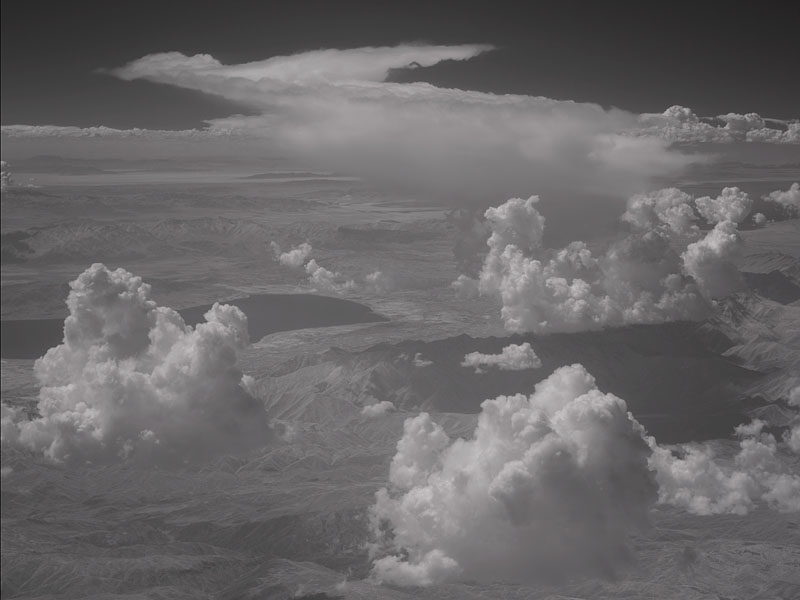
Even IR can't deal with all the scattering. Remember what I said about dust scattering all wavelengths. There's always a little dust in the air, and when you're looking through kilometers and kilometers of it, that Mie scattering gets pretty fierce. Photographs from an airplane, even with a deep red filter or an IR converted camera, are often going to be low in contrast. Figure 2 shows the original photograph that produced the lead illustration, with just a straight default RAW conversion.
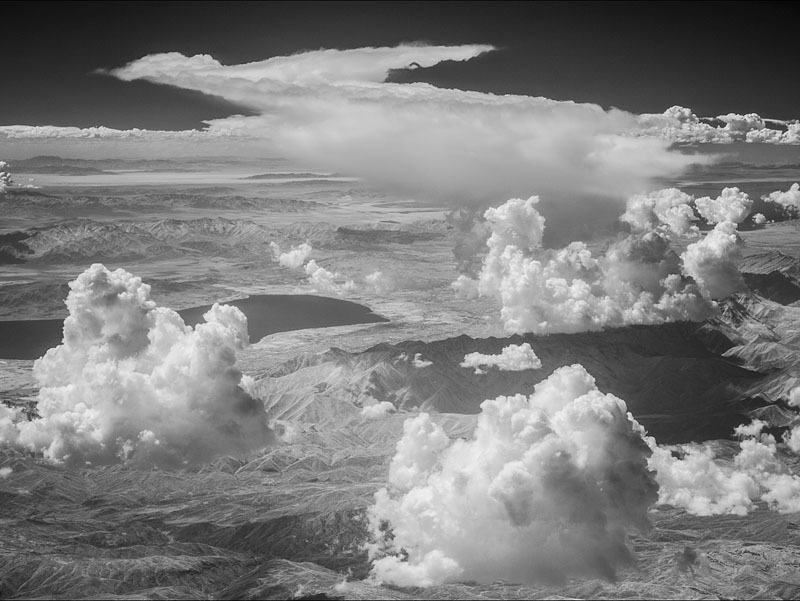
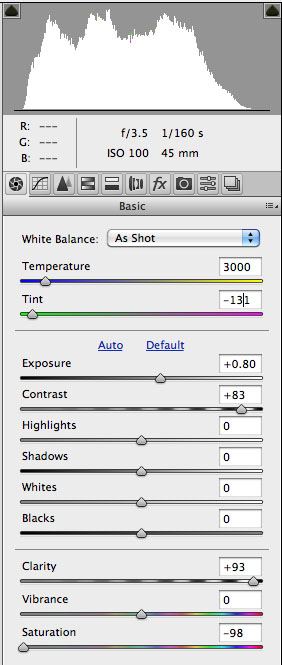
This is very low in contrast, even for an infrared photograph from the Olympus (see my earlier columns about infrared photography). I gave it a considerable boost in Adobe Camera RAW (figure 3) using the conversion settings you see in figure 4; I slammed those contrast and clarity sliders almost to the max. That still doesn't get me a great result, but at least it gives me a good starting point. I can tell you that a lot of work went into getting from this to the lead illustration, which prints gorgeously. At least I can get some sense of what I want the final photograph to look like from figure 3. Figure 2? Who can tell?
Most of the time I don't think digital photography or printing have made a profound difference in my photography. I was tolerably adept at making film and darkroom processes jump through whatever hoops I needed them to to get me to the print I wanted. This aerial stuff is something else. Having new tools and techniques at my disposal has made a huge difference in the quality of my results and my rates of success.
Ctein
Columnist Ctein flies high on TOP on Wednesdays—except this week, when he had to move over to make room for the print sale. Back to normal next week.
Featured Comments from:
Mike K: "I was thinking of your initial post before I took off from Amsterdam this morning—then the rain started pouring down and I left the camera in my bag in the overhead locker. Twenty minutes later we were through the rain, passing over the Dutch coast, looking back at an incredible stack of rain clouds with the morning sun illuminating the top. 'Bugger,' I thought...."

Hi!
Your lead illustration is really impressive, Could you tell us what exactly you did between figure 3 and the lead illustration? I am just coming back from a long flight over Siberia from Tokyo to Frankfurt with very similar photos from your figure 2 and wonder what else I could do to improve them?
Many thanks
Posted by: Maxim Kutscher | Friday, 01 November 2013 at 06:56 PM
Ctein,
You teach well. In most of your articles, I come away with at least one new thing I've learned. Thank you.
Mike
Posted by: Mike R | Friday, 01 November 2013 at 06:59 PM
Hi Ctein,
I had your lead shot open while a Pink Floyd concert was on TV; a great combination of arts.
Thanks to both you and Mike for an interesting and informative series of articles over the last few weeks.
best wishes phil
Posted by: Another Phil | Friday, 01 November 2013 at 07:16 PM
Dear Maxim,
Ummm, maybe, possibly ... if you can be patient. I'm out of the house this weekend and that file is on the home computer. When I get back I can check to see if the layers tell me much of what I did between figure 3 and the lead illo. I don't make notes on this stuff, I just do it, I'm afraid, but sometimes it all gets done in layers, so at least then there's some record of the steps that's been preserved.
Not so BTW, hoping to forestall the usually inevitable "but I like figure 3 better..." comments: it's not about what looks good in a JPEG, it's about what prints the best. Those are not the same thing. Just take my word that the lead illo produces the much superior print.
pax / Ctein
==========================================
-- Ctein's Online Gallery http://ctein.com
-- Digital Restorations http://photo-repair.com
==========================================
Posted by: ctein | Friday, 01 November 2013 at 07:25 PM
Another way to photograph from a plane is to do as Bradford Washburn did in some of his Alaska photos-- use a Lear jet with an optically flat window!
Posted by: Jim Ullrich | Friday, 01 November 2013 at 08:50 PM
Something else to learn. Thanks for this.
It helps if there is black and white to photograph.
http://www.flickr.com/photos/umnak/8182416677/in/set-72157632207247621/
Posted by: Joseph Reeves | Saturday, 02 November 2013 at 12:43 AM
Put a Gold Star on your chart; ya done good! I have a passion for daytime sky photography -- http://www.airgunsofarizona.com/blog/about-jock-elliott -- and this will help me in getting better results from the ground.
Cheers, Jock
Posted by: Jock Elliott | Saturday, 02 November 2013 at 06:24 AM
Many feel cloud shots out of airplane windows are pretty cliche, but I enjoy them. Both making and viewing the work of others. It's harder than most think to come away with a really outstanding cloud composition. I have enjoyed this series and your explanations. Well done.
Posted by: Eric Rose | Saturday, 02 November 2013 at 11:28 AM
I find that in digital, reversing the blue channel is much more effective than a red deep red filter. A negative copy of the blue channel applied as a grayscale mask to a color image can do a lot for haze reduction and increasing contrast at a distance.
For fake B&W infra red, boost the red until just before the histogram starts clipping, reverse the blue channel, and muck around with the green curves (fakes the glowing grass and "screaming trees" effect if that's your thing) until you like what you see.
Oh, and on a somewhat related note for lightroom users, instead of the built in B&W conversion experiment with setting the saturation to zero and see what happens when you drag the temperature and tint back and forth.
Posted by: hugh crawford | Saturday, 02 November 2013 at 12:49 PM
Ctein,
What governs your choice of cutoff - 29 is really deep red, but I know some are using cutoffs at even longer wavelengths.
Brad
Posted by: docbradd | Saturday, 02 November 2013 at 06:14 PM
Dear Brad,
29 red simply happens to be a readily available filter. I was recommending it because the usual choice for B&W landscape photographers is the 25 red; the less-well known 29 does a better job.
Otherwise, no, nothing special about it.
Do keep in mind that with an ordinary camera, be it film or digital, the closer your deep red filter gets to the IR cutoff of the film/camera, the more your effective exposure index drops.
pax / Ctein
Posted by: Ctein | Sunday, 03 November 2013 at 01:20 AM
@Ctein
This sentence really stopped me: "This is one of the very rare cases where "expose to the right" makes sense..."
Many well known photographers on the web pray "ettr" nearly like a mantra.
Could you please explain why you think different?
Thanks in advance,
Tom
Ps: great pictures btw!
Posted by: Thomas Kaschuba | Monday, 04 November 2013 at 03:17 PM
Dear Thomas,
Thanks!
And here's the explanation on ETTR:
http://theonlinephotographer.typepad.com/the_online_photographer/2011/10/expose-to-the-right-is-a-bunch-of-bull.html
pax / Ctein
Posted by: ctein | Tuesday, 05 November 2013 at 05:38 PM
Thanks for pointing me to the older post. Somehow I must have missed that. And it makes a lot of sense what you wrote back then.
Cheers,
Tom
Posted by: Thomas Kaschuba | Wednesday, 06 November 2013 at 05:21 PM