Words and illustrations by Ctein
[Since we're in the middle of a print offer featuring five of Ctein's expertly crafted digital IR prints, I asked him to explain his IR equipment, methods, and workflow. The resulting article was so long we decided to break it into two parts; the second half will appear tomorrow. —Mike the Ed.]
Let's start with first principles—my artistic philosophy. As I've written often, it's (deceptively) naïve: I want to make prints that show you what I saw. When I think, "Oh, look at that!" I want you to have the same reaction for the same reasons when you see one of my prints.
The naïveté is deceptive because any of you who have tried doing this know that it's bloody difficult to transform what the cameras sees into what you see. For a wide range of values of "bloody difficult"—sometimes it's terribly easy and on occasion it's impossible. It's my goal, regardless.
This creates a bit of a problem. I don't see in the infrared! Consequently, my goal gets a bit meta-. I want to make prints that show you what I imagine I'd be seeing if I did see infrared. It's no longer purely about understanding human visual perception; there's an element of imagination and a fair dose of physics knowledge in the mix.
It really helps that I can see what the camera sees in the infrared! I can't imagine doing infrared photography without an electronic viewfinder or screen preview (a.k.a. live view). No, I can imagine it, and it would be an exercise in frustration. I'd look at a scene, make a wild (albeit educated) guess as to what it looked like in the infrared, make a photograph, and look at the results on the screen on the back of the camera.
A lot better than in the film days, but still....
I started playing with black-and-white infrared digital photography back in 2008–2009, and you can see that work if you scroll to the bottom of this section on my website.
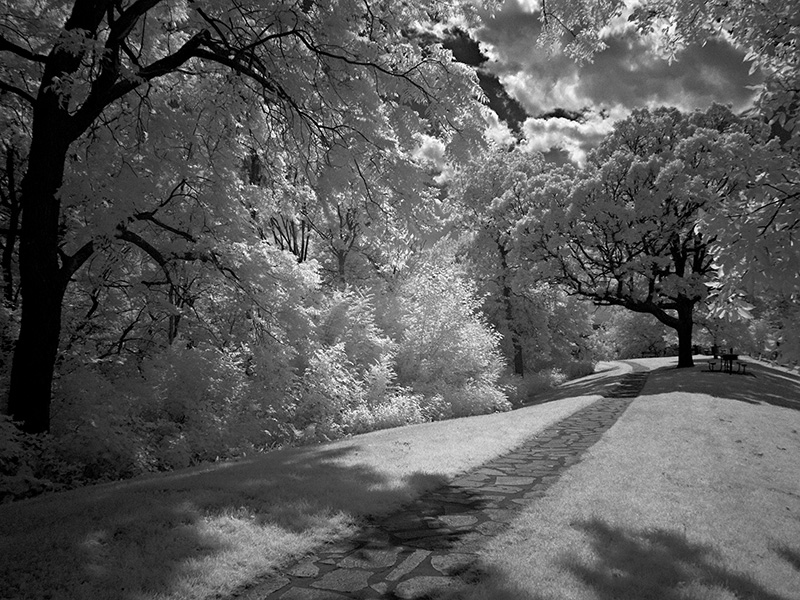
Back then I was using a Fujifilm Finepix all-in-one camera (I hadn't abandoned film yet) which had a weak-enough IR-blocking filter on the sensor that I could add a visible light blocking filter to the front of the lens and photograph solely in the infrared. At a very low ISO—single digits! But it worked, and the results were quite nice. I'm especially fond of this one:
Ctein, Buena Vista Park Path
Once I moved to more "dedicated" digital cameras, in the Olympus line (where I have stayed to this day), this trick stopped working—their IR blocking filters were too good. But I was hooked, so when I got my second Olympus camera, I had my Olympus Pen digital converted to pure infrared by LifePixel.
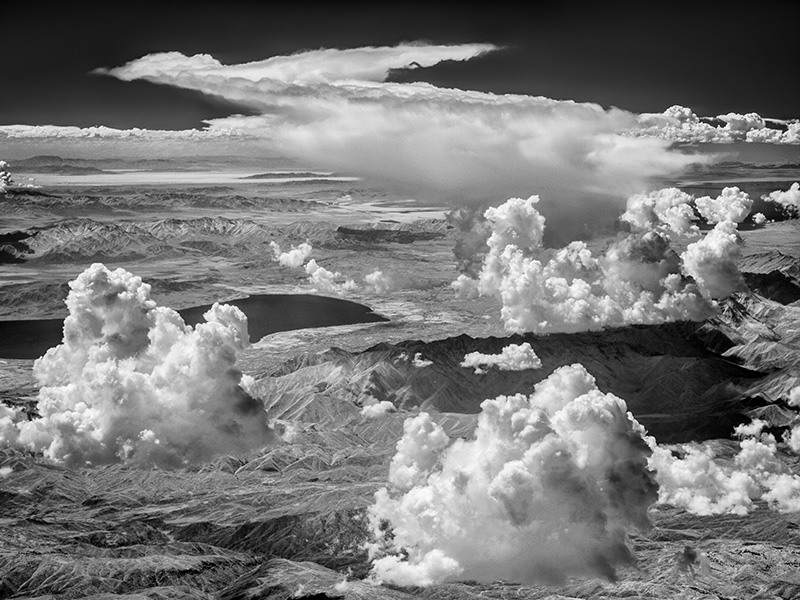
That was a real step up in quality, plus now I could photograph at decent ISO's! "Thunderhead over the Sierras" is another of my early favorites, made with that converted Olympus Pen.
Ctein, Thunderhead Over the Sierras
I've had three cameras converted by LifePixel and I've been delighted in every case. The company is responsive, helpful, and affordable, with conversions running between $200 and $300 (and sometimes they have sales). If you don't see your camera on their list, inquire. I cannot recommend these folks too highly.
They will even sell you an already-converted camera if you don't have a spare one to convert. That can run a lot more, because you're buying the cameras as well as the conversion, but an older used model may not cost any more than converting one of your own cameras. New cameras with lenses start at about $450 but most will clock in in the high hundreds for just the body.
About the conversions. LifePixel offers several different options. Go with a straight infrared conversion, unless you are positive you want to play with full spectrum photography. I thought about going that route and then realized that if I also wanted to do pure infrared photography (what I cared about most), I'd have to invest in appropriate filters for all my lenses—a.) inconvenient and b.) expensive!
Once you've made that choice, you'll discover that there are more options. I strongly recommend the Deep B&W Infrared conversion with the 830 nm cut off. It provides a much purer result than the Standard Infrared (720 nm) conversion. It costs you a stop of sensitivity, but with modern cameras (especially with image stabilization) this really isn't a problem.
LifePixel will also program in a custom color calibration (at least they did on my Olympuses) that produces a neutral preview and JPEG. Makes visualizing what you're doing a whole lot easier. I really do like these folks!
In case you're wondering, my current infrared camera is an Olympus OM-D E-M5 Mark II. If I ever replace my E-M1 Mark II with a newer model (no, the Mark III and M1X didn't do it for me), I’ll likely get that converted to IR and sell the E-M5.
Lenses
Okay, you've got a camera body, now what about the lens? This is hit or miss: conventional lenses are not corrected for aberrations in the infrared, nor do the anti-reflection coatings work very well there. The latter is the bigger problem. Poor reflection suppression results in large amounts of flare, a pronounced hotspot in the center of the field, and ofttimes images of the diaphragm blades. You will find that many lenses are simply unusable.
In addition, optical corrections may be a factor. This does not correlate with how well a lens works in the visible light. A lens that is good under normal circumstances may crap out in the infrared.
In any case, there will be differences to take into account. For example, my 12mm ƒ/1.4 Leica DG Summilux is unbelievably good for normal photography, even wide open. The aberration suppression is unbelievable. This is the lens I used for the aurora photography on my website; just take a look at those pinpoint stars! It's still very sharp and well corrected in the infrared—happy, happy me—but it has pronounced curvature of field. Fortunately, I always use this lens at ƒ/3.5–4.5 because outside of that range flare and/or internal reflections become intolerable, and this produces ample depth of field with a 12mm lens. I further cut the error in half by setting the focus window two-thirds of the way to one side of the frame. Works well enough!
In case you're wondering, the three lenses I use for infrared photography are that 12mm, the Panasonic 42.5mm ƒ/1.7, and the Olympus M. Zuiko 75mm ƒ/1.8. They all have their quirks in the infrared but they're all acceptable.
My favorite by far, oddly enough, is the 12mm. Why is that odd? Because I've never been particularly in love with wide-angle lenses. I've always gravitated to the long side. My standard always-on-camera lens for normal photography is the 42.5mm Panasonic. That would be the equivalent of 85mm in 35mm format. I rarely use anything shorter than that. But in infrared? The 12mm is my go-to lens. Don't know how to explain it, it just looks right. That was a big surprise, and it was one of the things that drove me to buy the Leica lens, because Olympus's 12mm lens is pretty punk.
Fine, I've got my equipment. Now I'm off to make photographs!
The viewfinder view is great. Decent contrast, a little bit flat because of lens flare, but good enough for me to evaluate a scene. The image is nice and neutral. When I look at the resulting photograph (well, actually the preview JPEG, as I photograph in raw) on the camera screen, it looks flatter than it did through the viewfinder, but still tolerable. Mostly I depend on what I see in live view; I only go to post-exposure chimping in IR to check focus and sharpness.
I import my raw files into Adobe Bridge and that's where the fun begins. Tune in tomorrow for the thrilling conclusion of my saga!
Ctein
Book o' the Week:
 Ernst Haas: New York in Color 1952–1962.
"When Haas moved from Vienna to New York City in 1951, he left behind a
war-torn continent and a career producing black-and-white images. For
Haas, the new medium of color photography was the only way to capture a
city pulsing with energy and humanity. These images demonstrate Haas's
tremendous virtuosity and confidence with Kodachrome film and the
technical challenges of color printing."
This book link is a portal to Amazon.
(To see all the comments, click on the "Comments" link below.)
Featured Comments from:
Peter Komar: "I'm fairly positive that LifePixel will now have a surge of orders for camera conversions. The IR images from Ctein’s website are gorgeous and just ooze silver like traditional darkroom prints but we all know are now inkjet printed, oh he has mastered that as well. Thanks for the print sale and posting the detailed and informative essays on the IR process, can’t wait for part II."


I have the original FujiFilm X100... and converted it to infrared (820). It's so much fun!
Posted by: Roland | Monday, 07 February 2022 at 09:30 AM
I've had a few cameras converted by LifePixel. They do good work.
Present IR armamentarium comprises two Panasonic GF1s. One has the standard conversion, the other the "super color." I found that, for the standard, if I set the film mode to monochrome and tweak it a bit, I can get some fairly usable SOOC jpegs.
For extra fun, I once printed one image as a negative onto 8x10 transparency film, and made prints of it both with cyanotype process, and with Van Dyke brown.
Posted by: MikeR | Monday, 07 February 2022 at 10:32 AM
Ctein is in good company using the 42.5mm Panasonic lens (85mm-eq.)as his "normal" lens. When I met Ralph Gibson, many moons ago, the normal lens he was using was a 90mm. --Mike
Posted by: Mike Johnston | Monday, 07 February 2022 at 02:01 PM
Excellent article. Thank you. I've tinkered with IR and a converted Olympus E-PL2 with an IR-standard filtration, but Ctein's article just convinced me to convert an EM-5 that's been placed into reserve when I got an EM-1 II.
FWIW - the Olympus 14-42 II kit lens seems to focus IR reasonably well, but I appreciate Ctein's suggestions on the Panasonic 42.5 and Oly 75. I have to try those out as well. Sadly, the 12mm Summilux is too rich for my budget.
Posted by: Joseph L. Kashi | Monday, 07 February 2022 at 05:03 PM
Dear Joseph,
I don't think I tried out the 14-42 kit zoom in the IR. It's a quality lens in the visible, comparable to good primes, dunno why I didn't think to. There are times when I do need something between 12 and 42!
No problem with unmanageable flare or hot-spots or diaphragm images?
pax / Ctein
Posted by: Ctein | Monday, 07 February 2022 at 08:56 PM
I'm fairly positive that Life Pixel will now have a surge of orders for camera conversions. The IR images from Ctein’s website are gorgeous and just ooze silver like traditional darkroom prints but we all know are now inkjet printed, oh he has mastered that as well. Thanks for the print sale and posting the detailed and informative essays on the IR process, can’t wait for part II. Does Ctein’s printer use original EPSON inks or perhaps converted to all Monochrome ink sets ?
[He uses Epson Ultrachrome HD inks. --Mike]
Posted by: Peter Komar | Monday, 07 February 2022 at 09:41 PM
Oh, please do an infrared Baker's Dozen!
Posted by: cormackphotos | Monday, 07 February 2022 at 11:55 PM
Dear Joseph,
Thanks for the suggestion! I don't recall trying out the kit zoom for IR work (It's very good in the visible). I'll report back!
It'd be nice to have a usable lens between the 12 and the 42.5.
pax / Ctein
Posted by: Ctein | Tuesday, 08 February 2022 at 04:52 PM