Words and illustrations by Ctein
[Since we're in the middle of a print offer featuring five of Ctein's expertly crafted digital IR prints, I asked him to explain his IR equipment, methods, and workflow. The resulting article was long, so we decided to break it into two parts. The first half can be found here. The sale ends tomorrow, Wednesday, at 11 a.m. EST. —Mike the Ed.]
Picking up where we left off yesterday...
I copy my raw files into Adobe Bridge, to be viewed and culled, massaged by Adobe Camera Raw (ACR, which is also used by Lightroom), and exported to Photoshop.
What I see previewed in Bridge doesn't look very much like what I saw in the camera. The problem is that one never looks at a straight raw image; what's displayed to you is always heavily massaged behind the scenes. (Okay, there are ways to see what an unadjusted raw image looks like, but you really, really wouldn't like what you saw!)
There are all sorts of assumptions that go into portraying a raw file so that it looks like the photograph you are expecting it to look like. The camera manufacturer builds in those assumptions and they get worked into the screen portrayal before you ever see the results. I've discussed a few of the assumptions in previous columns:
and
Take my word for it, these aren't all the hidden parameters. Color balance would be another one.
A program that is supposed to do a good job of displaying (and manipulating) raw files needs to take this stuff into account. That, not so by the way, is why software publishers can't instantly update their programs when a new camera model comes out. They have to incorporate the new camera's assumptions into their programs before the software will do a proper job of rendering files.
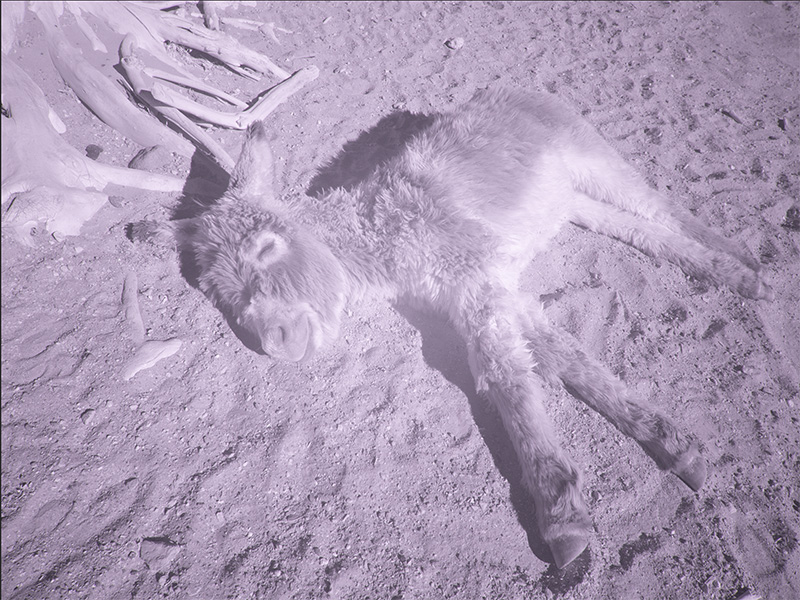
Therein lies the rub. IR camera conversion is something the default assumptions don't plan for. Typically, the raw file will render much flatter than it looks in the camera and it will no longer be a neutral gray, because that neutral-making color balance that LifePixel provided doesn't get communicated through. Figure 1 shows what I typically see when I look at a raw file before making any adjustments.
Fig. 1
(Actually, that one looks better than most. The lighting was very contrasty, being midday sun in Nevada.)
Since we're being uber-technical this time, here's the dope you're all dying to know: photographed with the 12mm Leica lens at ISO 200, ƒ/4.5 at 1/80th sec. Camera is a converted (830 nm) Olympus OM-D E-M5 Mark II, original image size is 20 megapixels (~4600 x 3500 px). There, we now return to the tutorial in progress.
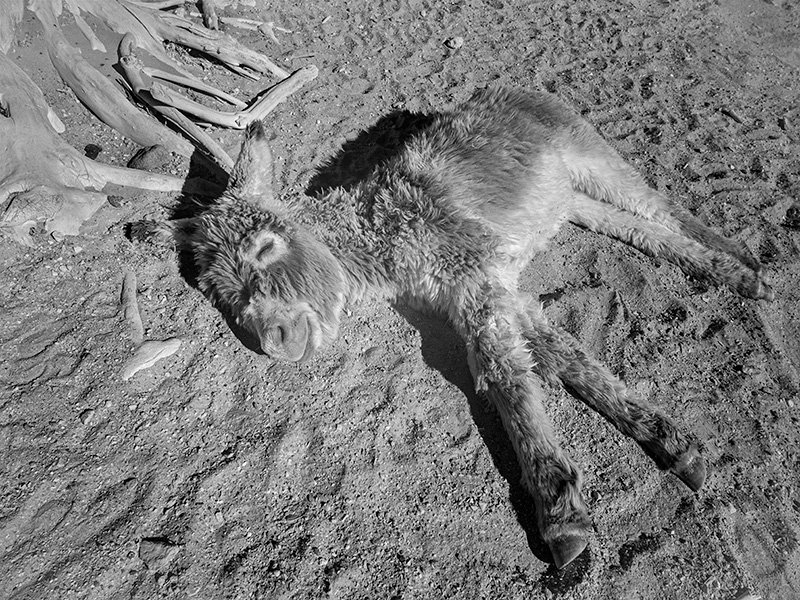
(And—in case you're worried—that is a sleepy baby burro, not a sick one!)
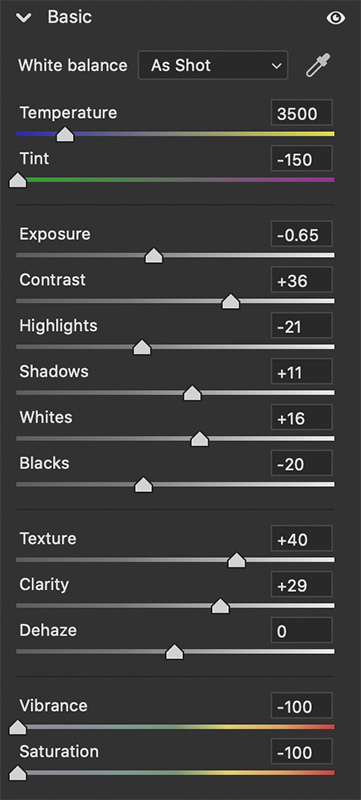
I used to have my own set of routines for pulling such renderings into some semblance of decency, but recent generations of ACR have really upped the game in their "Auto" settings button. It does a decent first pass on my infrared photos. Auto has a few problems—it clips the blacks and the whites some, which I very much don't want, and it doesn't always get the exposure compensation right. I nudge the black-and-white sliders much closer to zero to give me plenty of headroom to work with and adjust the exposure to taste (figure 2).
Because of the poor flare characteristics of normal lenses operating in the infrared, micro-contrast and gradation also suffer badly. Consequently, every infrared photograph I make gets a hefty dose of Texture and Clarity, which ACR Auto normally leaves set to zero. How much of each depends upon the photograph—it's one of those season-to-taste things. One has to be careful with Clarity, though, as it can produce ugly halos at contrasty boundaries.
The other thing that ACR Auto doesn't do is wipe out the color tinge, so I pull the vibrance and saturation sliders all the way down to –100.
Finally, I go to the Effects tab in ACR and add a measure of de-vignetting to partially eliminate the hotspot in the middle of the photograph. I can't take it all the way in ACR, but I can make it a lot better.
Fig. 3
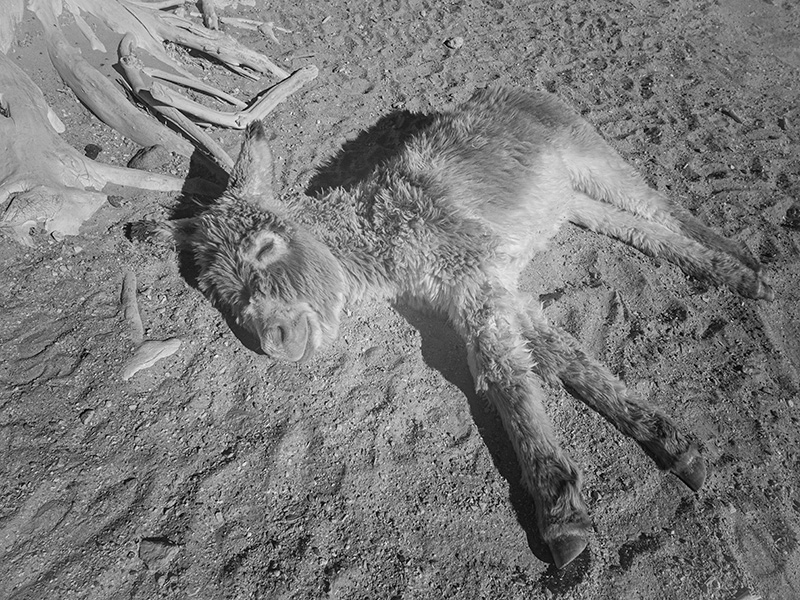
The results of all of this are what you see in figure 3. It's a good starting point. By intent, it's too low in contrast, and I haven't applied as much Texture and Clarity as I might because I want to leave "space" to work in. If I need more of either of these down the line, I can open up the Camera Raw Filter in Photoshop, which gets me back into ACR's controls.
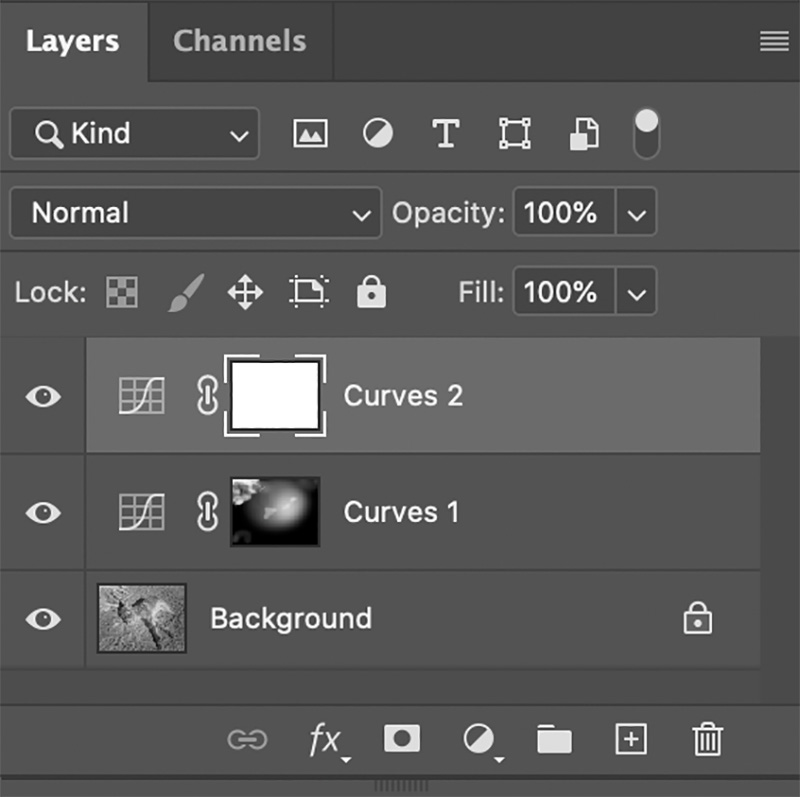
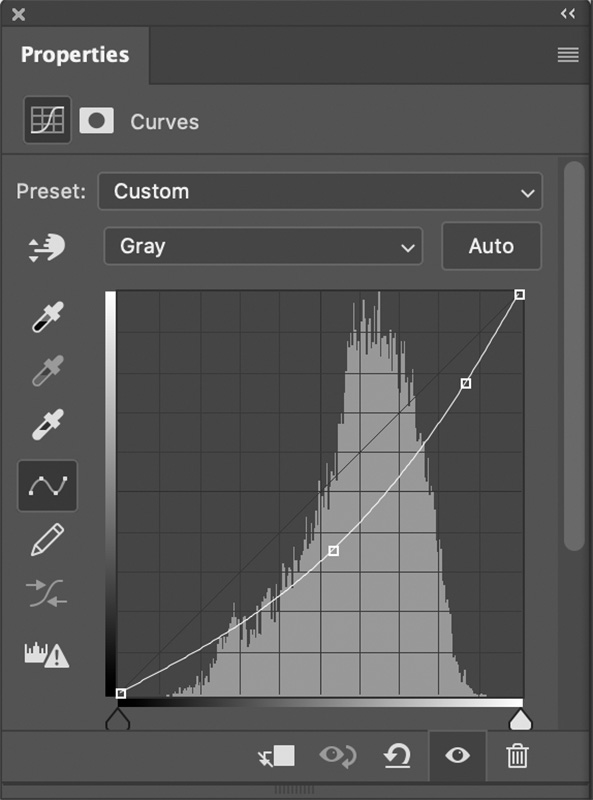
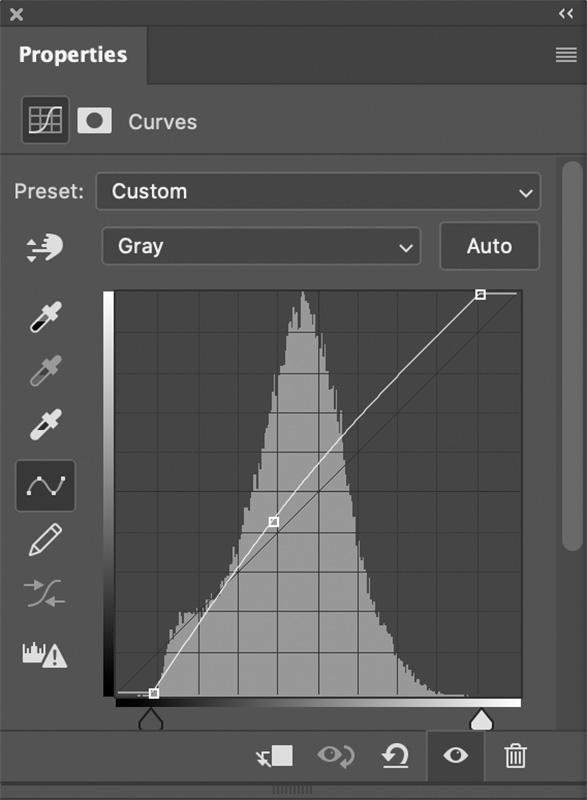
Next, I make some curves adjustment layers (figure 4). Curve 1 (figure 5) is for burning-in, and I use it to get rid of the remainder of the hotspot and make some other cosmetic burns that I want by painting into the mask. Curve 2 (figure 6) is an overall tonal adjustment to get me some true blacks and whites and lift up the midtones a bit for a slightly brighter print.
The result of all of this is figure 7, which is very close to what I want in my final print. The brightness and tonality may not look correct in an on-screen JPEG, so trust my word on this.
Fig. 7
Am I done? Very likely not. In a fair percentage of IR photographs the drastic increases in contrast and especially micro-contrast accentuate "grain" to an unacceptable degree. It's a fine balancing act between pulling out maximum fine detail and just generating sand! Several tools can attack that. ACR's own noise reduction tool does a surprisingly good job on pixel-scale noise without degrading fine detail or subtle gradations of tone. As always with noise reduction, one has to take care not to overdo it, but it can be a big help.
My go-to tools are the Topaz Labs programs: Denoise AI, Sharpen AI, and Gigapixel AI. All of these do an exceptional job of separating out image noise from real detail, suppressing the former while emphasizing the latter. Most of the infrared photographs I print get treatment from one of these programs (which one depends on the photograph).
I do my printing in Epson's Advanced B&W Photo mode, which is superb at rendering a balanced tonal scale. I like things straight-up neutral, but it has adjustments to produce warmer or colder "grays" if that's to your taste.
That's pretty much my whole workflow.
Thank you, thank you, you've been a lovely audience! Don't forget to tip your server on the way out, and please visit our elegant print sale.
Ctein
Book o' the Week
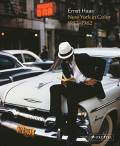 Ernst Haas: New York in Color 1952–1962.
"When Haas moved from Vienna to New York City in 1951, he left behind a
war-torn continent and a career producing black-and-white images. For
Haas, the new medium of color photography was the only way to capture a
city pulsing with energy and humanity. These images demonstrate Haas's
tremendous virtuosity and confidence with Kodachrome film and the
technical challenges of color printing."
This book link is a portal to Amazon.
(To see all the comments, click on the "Comments" link below.)
Featured Comments from:

Ctein's two IR articles are most helpful and appreciated. Thank you.
Posted by: Joseph L. Kashi | Tuesday, 08 February 2022 at 12:32 PM
"...My go-to tools are the Topaz Labs programs: Denoise AI, Sharpen AI, and Gigapixel AI..." The same tools I use in most of my to print photographs, truly exceptional.
Posted by: Marcelo Guarini | Tuesday, 08 February 2022 at 01:50 PM
Ctein—
Thanks so much for these two very helpful tutorials! I have always liked IR images and this sale and your posts have persuaded me to have LIfePixel convert one of my cameras to BW IR. Should be a fun adventure! At the moment I’m trying to decide between converting a Sony full frame camera and a Fuji X camera. Thanks again!
Posted by: Steve Rosenblum | Tuesday, 08 February 2022 at 03:45 PM
99% technical, 1% emotion. Makes for boring photography.
Posted by: Farhiz | Tuesday, 08 February 2022 at 11:03 PM
Is "how to glue the dowels on your snooker table" next up on TOP?
[Well, it hadn't occurred to me, but now that you mention it I *could* prepare a 3,000-word step-by-step tutorial about how to develop 35mm film...my qualifications are that I tried every method known to humankind and made every single one of all the possible mistakes. --Mike]
Posted by: Andrew Kochanowski | Wednesday, 09 February 2022 at 07:13 AM
Thanks for explaining your process. FWIW I've found shooting in IR (in my case, a Sony A7 converted with a Lifepixel 720nm filter) to present a dizzying array of approaches for rendering the IR file into grayscale. The trick is to find a way to exploit the medium's signature strengths to create a vivid image without calling attention to itself. But then that is true of most "alternate" photographic processes.
Sanders McNew
www.instagram.com/sandersnyc
Posted by: Sanders McNew (former Random Excellence featured photographer!) | Wednesday, 09 February 2022 at 11:35 AM
The lifepixel conversion for Deep IR I just leave on high contrast BW mode in my camera... all my shots come out perfect, but thats just me... you have to like jpgs. Also, it looks like that Leica 12mm has some IR hotspotting in the middle (reduced contrast and higher brightness in the center of the frame), prolly nothing.
Posted by: Taran Morgan | Thursday, 10 February 2022 at 02:46 PM
Dear Taran,
So far as I've seen, every lens not designed specifically for IR is going to show hotspotting in the middle. It's unavoidable. What you want to avoid is a lens where it's so severe that you can't correct for it reasonably well in printing, or where it shows the outline of the diaphragm blades or some such. It's not too hard to get rid of a uniformly soft-edged blob that fades out. A whole 'nother thing to deal with sharp edges!
pax / Ctein
Posted by: Ctein | Friday, 11 February 2022 at 06:24 PM